Showing posts with label DIY. Show all posts

Tuesday, September 25, 2012

Crib Spring Photo Solution

When I made my to do list back at the beginning of the month, one of the items included was to work on a way to showcase some of Charlotte's artwork and family photos. Whatever I decided to do needed to meet a few requirements. It needed to be made in such a way that it'd be easy to swap out one item for the other whenever I saw fit. I know myself. And I know that if it requires taking down a frame to swap out a photo I'll have the same photos up years from now. I also knew that it needed to be cheap. I am a tightwad, after all. Here's what I came up with:

One of the casualties of our basement flood last year was Charlotte's crib. The wood pieces all got pitched, but I wisely saved the spring since it wasn't damaged at all. A leftover crib spring plus a scrap of wood and some screws was about as cheap as you can get (ie. completely free), and with the addition of a few binder/bullnose clips (to be replaced when I come up with something cuter), it's easy to change out pieces. Hanging it was super simple. I just screwed a small piece of wood horizontally to the studs, then removed two of the actual coils so I could send a screw through the resulting hole into the wood I'd screwed onto the wall. Clear as mud, right?! Yeah, I know. But I promise you, it couldn't be easier. Then I just clipped up some favorite photos and artwork.

I'm so stoked that the spring fit into this spot. It wedges just perfectly between the bathroom door and my bedroom door. Seriously, there's only about 1/4 of an inch to spare. And best of all, Charlotte's really excited about it. It's fuller than what is pictured here because she's already found other drawings and paintings that she wanted to add to the mix. Love that!

I've never been one to hang photos of my family everywhere. For one thing, I don't have many (well, I have lots - just not printed out). But mainly because it feels weird. I don't know why since I like it in other people's homes. But this bulletin board of sorts just feels right. I love being greeted by it every time I head up the stairs!


Sources: La La Love You print - Sparkle Power, Let the Sun Shine In print - Slide Sideways, pants hanger - Ikea, paintings - courtesy of Charlotte, super cute girl in the photos - courtesy of me :)

Wednesday, July 25, 2012

Head of the Bed

I haven't shown you much of my bedroom before, have I? There's a reason for that. Well, a couple actually. For one thing, the room is tiny. Like really tiny. About 12 x 15 to be exact. And that makes photographing it very difficult. But more importantly, it's been completely neglected since we moved in over 18 months ago. It got painted right away (had to cover up that horrible faux job it started with), and I made 
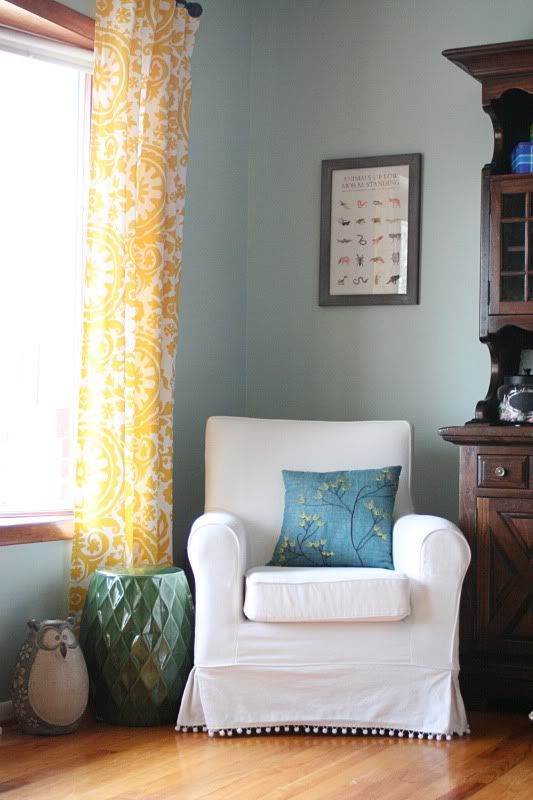
curtains (which I recently swapped out for something different), but aside from that it's been untouched and unaccessorized for the entire time. I haven't made much progress, but did finally tackled one item on that room's to do list the other day - getting a headboard up.

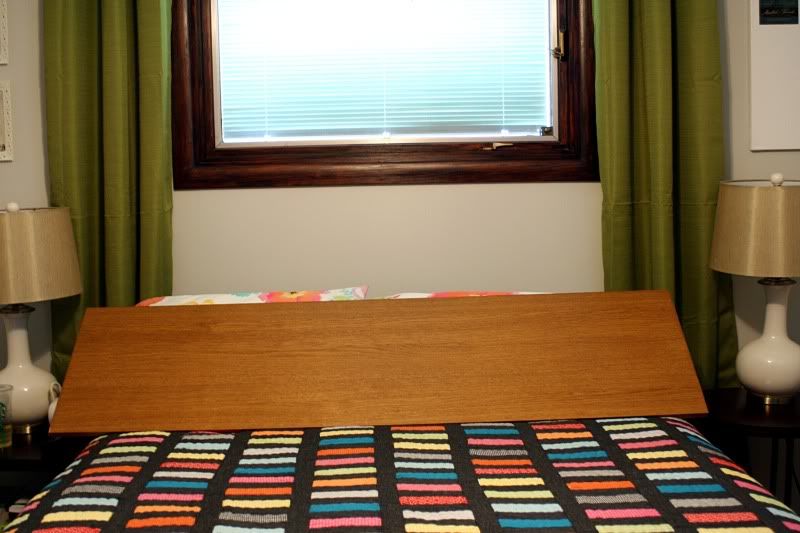
When I started my little project the view of the bed was just what you see above. The window basically functioned as a headboard and that worked just fine for me. The problem is what you can't see. We have baseboard heating and it's positioned right under the head of the bed. With pillows resting up against the wall the heat, and more importantly the A/C, was blocked completely. Something had to be done.

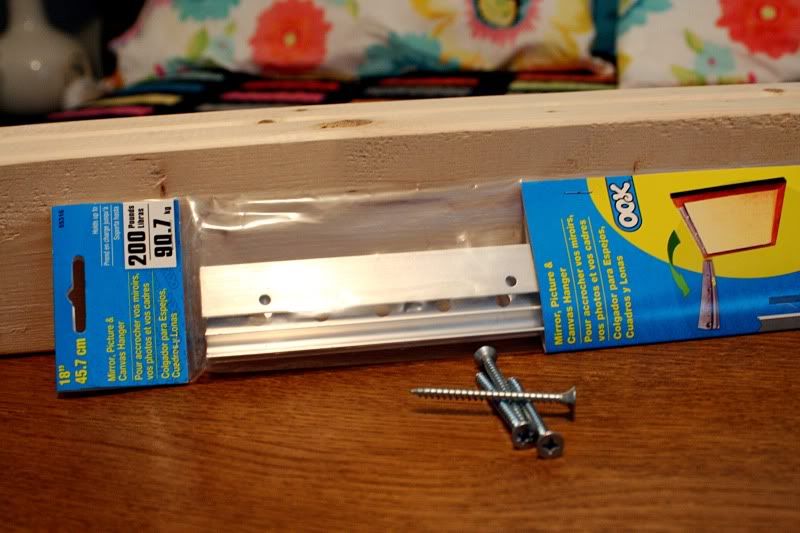
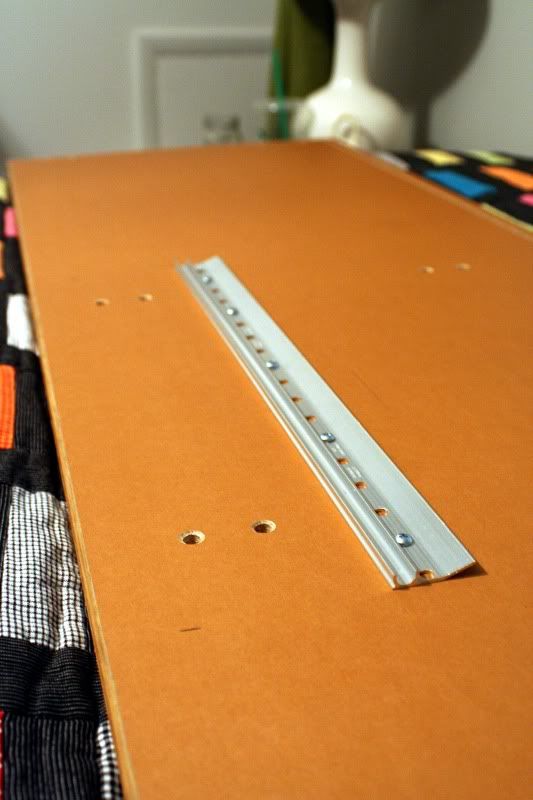
So I picked up a piece of wood from the As-Is section of Ikea for just $4. I'm not sure what it was meant for (a dresser maybe), but I liked the color and the size was right - it was a few inches wider than a queen mattress and about 15 or so inches high. That plus some spare pieces of wood and a heavy duty picture hanger was all I needed to create a headboard that would allow air to flow up behind the mattress and pillows.

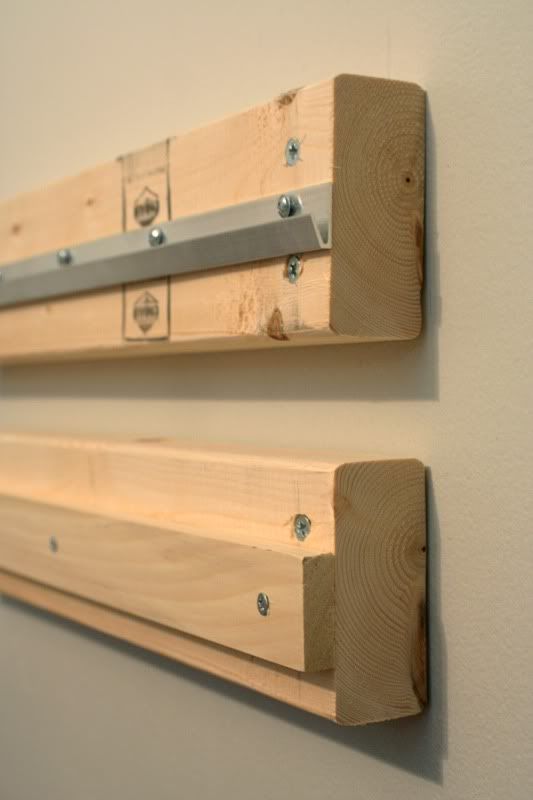
I began by attaching 18 inch lengths of 2x4s to the studs. The idea was that rather than attaching the headboard directly to the wall, the 2x4s would create a gap between the headboard and the wall that would allow air to flow. And while the top 2x4 is the only one that was actually going to be attached to the headboard, I figured the bottom one would provide a bit of stability in that it wouldn't allow the headboard to angle toward the wall.

Next up I attached one half of the picture hanger to the top 2x4. It came with screws and a tiny level, so this part of the process was pretty simple. But it was then that it occurred to me that the picture hanger was adding some extra depth to the top 2x4 that the other didn't have. So out came another piece of spare wood that I attached to the bottom 2x4 to make them even again. After that, it was as easy as screwing the other half of the picture hanger to the headboard and putting it up. The halves of the picture hanger slide into one another and can be adjusted side to side to ensure it's positioned correctly. Any fool can do it (ahem, me).

I'm super happy with the result! I think the wood tone brings a nice warmth that the space was lacking before, and I definitely can't complain about the cost. About $20 or so ($15 for the picture hanger and $4 for the Ikea remnant). Not to mention, it does exactly what I need it to do - let's the air flow up the wall. My nights have been noticeably cooler!

On a side note, I used another of those picture hangers to hang a giant chalkboard (it's 5 feet wide) in my dining room. And we've gotten new dining room chairs (ask and ye shall receive), and done a little rearranging in the living room. Definitely a lot of movement around our house!!

So, what have you been up to? Any great cheap fixes you've made lately?


P.S. Happy, happy, happy, happy, HAPPY BIRTHDAY Caleb!! And Keira too!

Thursday, May 10, 2012

Semi-Homemade Invitations

Like each year before, I've got lots of plans for Charlotte's birthday party. I'm sure you remember that Miss C requested a flower party and I found what I believe is the perfect invitation to link the flower theme with the backyard event we were planning. These "Let's Picnic" invitations are downloadable for free from Amy Moss of Eat, Drink, Chic. I love them so much! So much that I may still use them for a different party. Yup, not for this one. Even though they're perfect for the event, I just didn't have time to print and assemble them, not when I was running low on both cardstock and ink. Not to mention time.

Invitations were still a necessity though, so I went on the hunt to see what I could find in stores. My mom and I hit up Target and Michael's with no luck. And then we stopped and Kohl's and hit the jackpot with these cute flower-themed numbers.


First things first, ignore the quality of the photos. I worked on these during my lunch break and left my camera at home, so cell phone pics is what you get. Second, I too realized that these invitations did have a drawback. They aren't invitations. Minor detail, right? But that little 'Thanks A Bunch' on the front can totally be remedied. I started out by turning the once blank interior into your typical fill-in-the-blank invitations. This is super simple to do. Just measure the interior of your card and use Microsoft Word to make a page in that size. Then create a text box with your wording and run the invites straight through your printer. You could even write up party specific wording instead of the fill-in-the-blank version.


With the inside completed, I turned my attention to the front. I found a piece of cardstock in a coordinating color (really simple since there were so many to choose from) and ran it through the printer to create little tabs that say 'You're invited..." A little bit of adhesive later and I'd covered up that pesky 'Thanks A Bunch' with something more invitation appropriate.


And then all that was left to do was address and mail them out! Have you been tweaking anything premade to be semi-homemade in order to better fit your needs lately?

Wednesday, March 21, 2012

Too Short Slipcover Solution

Like tons of people out there, especially bloggers it seems, I have some Ikea furniture. I'm not a big fan of all the store's stuff, but I do love my Ektorp Jennylund chair. You just can't go wrong with a comfy armchair and its slipcover that can be washed at a moment's notice. Especially with an afforable $200 price tag. I do have one complaint though...


It's a little hard to see in this photo (taken just after we first painted), but the slipcover is so darn short. Ugh. That floodpants length really ruins the look of an otherwise nice piece of furniture. It's irked my nerves enough that I decided I needed to do something about that 2 or so inches of empty air. Wanna see my solution?


Do you see what I did? Need me to go in for a closer look?


I snagged some white pom pom ball fringe (from this Etsy seller) and added it to the bottom hem of the slipcover, going all the way around. I love the result! You really don't see the gap any longer, and it's such a fun addition. And since it only took about 1/2 hour from start to finish - taking the cover off, sewing the trim on (I didn't even pin) and putting the cover back on - and cost less than $7 including shipping, I'm left asking myself why I didn't do it sooner. I'm ready to add pom pom trim to just about everything now!!

Have you found any quick and easy solutions lately?

Tuesday, January 10, 2012

The Rough Plan

I mentioned yesterday that for now my house focus is on decorating Charlotte's room. She's lived with basic pink walls, which thankfully is now her favorite color, for a year now. That's really been it in terms of decor for her space. She has no curtains, no artwork, no nothing. Poor neglected baby! I've had a board for her room for a while now, and added a boatload of pins to it yesterday. I'm starting to see how it can all come together and think I may actually accomplish something in her space relatively soon. Yahoo for small miracles! Here's a glimpse of the plan:


And now for some explanation... I just got the floral sheets for Christmas. For my own queen-sized bed. We never use a flat sheet though, so rather than have it sit unused in the linen closet I plan to pair it with a more subtle pattern to make a duvet cover for C's bed. Speaking of which, I'm on the hunt for an old iron bed to paint. I'm kinda digging the brass look of these, but may opt for white instead. Only time (and Craigslist) will tell. No matter what finish I go with, I'll definitely be making some egg carton twinkle lights and bringing in a bit of Mr. Pan, since Charlottes loves him so much!

And then I'll begin spray painting. I plan to peruse the thrift stores in my area to find some hideously ugly knicks knacks that I can liven up with a little paint. I'll also snag some frames to paint, and add them to the gallery wall I'll create above her dresser, which will likely include this super cute cuckoo clock that Gramma got her a while back. And once all that painting is done we'll have to see how much energy I have left in me, cause I'm thinking about painting some bold, crazy stripes (inspired by these) on her ceiling. Yeah, I know. I'm nuts.

The plan is rounded out with some awesome scripture art, some homemade curtains topped with soft, vintage chenille, the dollhouse that I hoped to have done by Christmas, but now hope to DIY in time for her birthday, and a Craigslist vanity that I'll be painting turquoise after falling in love with this cheerful piece. As I write it all out here, it sure seems like a lot. But like I said, I'm excited to pull together a space for my little munchkin. I'll be sure to share my progress along the way!

Thursday, August 25, 2011

Shoes Off Please

A few months back I shared how I turned a blank wall into an entry space that works for us, complete with coat hooks and a ledge.


I love the new set up, but have long felt that I needed to add something to the area below the ledge. I contemplated wallpaper or tone-on-tone paint treatments, but still haven't decided what to do to jazz up this space. I figure it's best to just let it be and allow myself to be inspired sometime. But, I did move forward with a project I saw a while back (on a blog I'm sure, don't remember which). I grabbed some wooden letters (mentioned that on Monday) and got out the same latex paint I used on the walls (Behr's Valley Mist) and started painting.


Each letter got two coats, which I allowed to dry fully before flipping them over and applying some modge podge to the back. Then I pressed them into the wall for about 30 seconds each before moving on to the next letter.


It's silly I know, but this little phrase makes me smile every time I see it. And, even though she can't read, Charlotte knows what it says and has done a better job of putting her shoes where they belong when she gets in the door. That'll be short-lived for sure, but I figure it's still a good reminder.


P.S. I'll probably go back and caulk around the edges of the letters, where they meet the wall. At the very least I'll slap another coat of paint on to try to cover the small gaps. But for now I'm content to leave it as is.

Tuesday, August 16, 2011

Crate Bookcase

I've become a pinning fool and spend a ridiculous amount of time pulling together inspiration for future projects on Pinterest. I'm going to pat myself on the back for managing to complete four things based on pins so far. The first was a Father's Day gift for Mark, the next the cross stitch wall art that I shared two weeks ago, and the third being the laptop sleeve that I mentioned yesterday. But right now I'm ready to give you the rundown for how I made another.


Old wooden crates are popping up everywhere lately, and I was particularly smitten with the idea of using crates as a bookcase, like the one pictured above. I love that it's a little weathered and beat up looking (perfect for a house with a toddler) and that being on casters makes it super-mobile. So I hunted down three similarly sized crates (two from an antique store in my area, the other from ebay) and hit up Home Depot for some supplies.


I grabbed a long, thin strip of wood. I have no idea what it was called, or what it was meant for (I seem to recall it saying threshold on the tag), but I liked the color and imperfections it had. And the price (less than $2) was right up my alley. That piece, plus four casters, was all I needed for this little project. I took everything outside and began to formulate a plan. It was important to me that the bookshelf be able to be disassembled pretty easily. What can I say? I'm fickle and wanted to make sure I could use them as actual crates, or mount them on the wall, or chop them up for firewood (ok, not really) if I felt so inclined. I figured it'd be best to use two strips of wood along the backside of the crates as a way of "attaching" them to each other. In reality, they're only attached to the wood strips. So I eyeballed how long the strips should be, marked the wood and got to cutting.


I also cut three shorter pieces of wood (not pictured) to attach to the base of the bottom crate, with my plan being to attach the casters to those pieces rather than the crate itself. I used screws and washers to attach the casters and then nails to attach the wood pieces to the crate.


With the casters on and ready to go, it was time to attach the wood strips to the back of the crates. For this step I predrilled pilot holes through the wood strip and the crate and then drove extra long nails through the holes from the back. I was left with about an inch of the nail poking through to the front side of the bookcase, which I bent down with my hammer. I thought about using shorter nails, but everything I tried felt a bit unsecure, and I figured the bent nails only added to the beat-up, rustic charm. Right?!


And with that, it was done. I carted it inside and set it up in the living room. I haven't put it to use yet, but I'm loving the look of it in the space.


Have you pinned any other ideas using crates? Here's a few more I like: toy bins, on the wall, as planters, bathroom storage, more on the wall.

Thursday, June 2, 2011

Summer Fun List

Lots of bloggers are doing it, so I decided to jump on the bandwagon. I made a list of fun activities for our little family of three (and occasionally more) to do this summer. It's not a hugely involved list because Mark and I will still both be at work full time, but we do have a short vacation or two planned, not to mention some random days off here and there.


The photo is a little out of focus (sorry, I was taking photos at about 8pm and the light was basically gone), but here's our list. Despite several years of writing on flip charts for a living, I cannot write in a straight line to save my life. Luckily I had some striped gift wrap in my stash. I just cut it to size and used it as my guide. The list got popped into a frame and we'll use a dry erase marker to check off the items (right on the glass) as we go. Here's a few detailed shots of what we plan to accomplish these next few months:


I may swap out the paper and do this every season. And if I didn't already have a chalkboard wall in my kitchen, I'd use this idea to keep track of our weekly menu and grocery list. As it stands, this summer fun list will live in the dining room once I find some adhesive hooks that will work for it. Here's the plan:


Have you made a similar list for your family? What are your to dos for this summer?

Search This Blog

Blog Archive

Follow Me on Pinterest

Followers

  © Blogger template 'The Pattern' by Ourblogtemplates.com 2008

Back to TOP